
Rare map sheds light on deadly perils of the Great War’s forgotten campaign
A rare map from McMaster’s extensive World War One map collection is shedding light on the little-known German East Africa campaign where troops were more likely to die from disease than enemy fire, and which was fought in regions so remote, its soldiers were the last in the Great War to lay down their arms.
BY Erica Balch
November 8, 2018
It was a theatre of war unlike any other in World War One.
It was a place where soldiers on both sides were far more likely to be killed by animal attacks or disease, than by enemy fire. A place where battles raged in mountainous jungles so remote that news of the November 11 armistice took days to reach many units, making the soldiers who fought on this front the last in the Great War to lay down their arms.
This was the nature of the campaign in German East Africa – located in what is now Tanzania, Rwanda and Burundi. It was a guerilla war waged thousands of kilometers from the trenches of France and Flanders, where the fiercest enemy was often the environment and knowing where to find fresh water could mean the difference between life and death.
Now, a rare map contained in McMaster’s extensive World War One map collection is helping to shed light on this little-known chapter of the First World War.
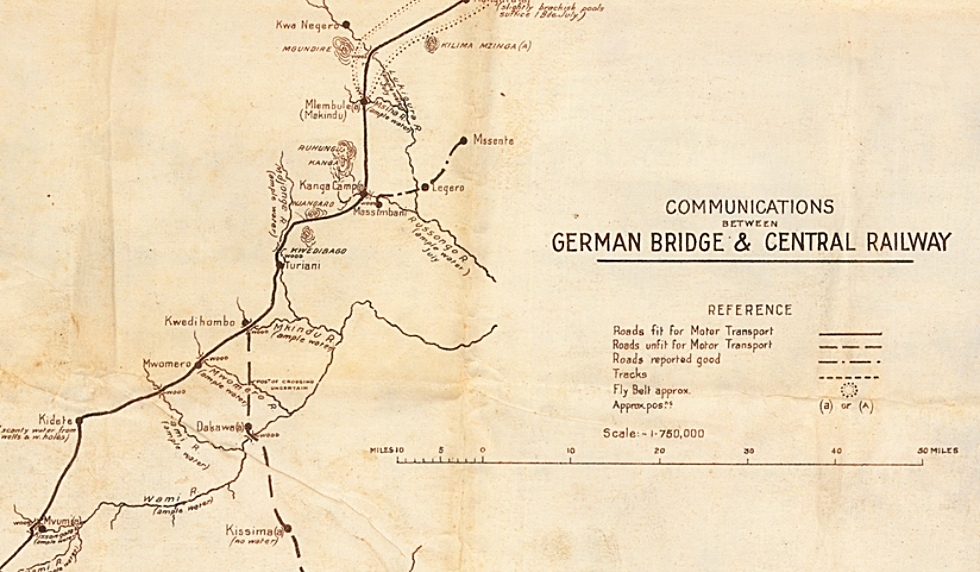
“You could very easily ignore this map at first glance because it’s not attractive – it’s quite skeletal, and it’s black and white. There’s no real topographical information showing slope or elevation, and no contour lines,” says Gord Beck, maps specialist at McMaster University Library. “But actually, this map says a great deal – it reveals the unique and deadly perils of this campaign.”
The mud-stained map – part of McMaster’s Lloyd Reeds Map Collection and possibly the only known surviving map of its kind – includes a network of roads, bridges and communication lines, but much more remarkably, according to Beck, shows the locations and quality of water sources throughout the region, and highlights a large area known as the “fly belt,” where swarms of disease-bearing tsetse flies and other insects were to be avoided.

“The notations on the map about water are given a lot of attention, they indicate whether there’s ample water, scanty water, clean water – this was essential to know,” explains Beck. “But the most unique aspect of this map is the delineated fly region. This zone is a warning to troops that this was a bad area for insects, especially the tsetse fly – it’s something you would never see on a military map from any other theatre of war.”
According to Beck, for every casualty caused by enemy fire, there were 29 casualties from illnesses related to contaminated water or insect bites, including that of the tsetse fly which transmitted parasites into the body of its victims causing African sleeping sickness – an infection that attacks the central nervous system and which, at the time, was almost always fatal.
“Running out of good water to drink on these missions or encountering insect infestations was more of a danger than running into the enemy,” says Beck “Knowing where the hazards were and how to avoid them was a matter of survival in this campaign, and this map provides that information.”
As in Europe, war broke out in German East Africa in 1914. The Allies (Britain, France and Belgium), were keen on expanding their interests in East Africa and on capturing key German wireless stations. The German strategy was to fight a defensive war, hoping to draw as many British troops and resources from the Western Front as possible.
But, rather than diverting troops from European battlefields, Britain instead assembled a force largely made up of South African, Indian and other colonial troops, with both German and British armies relying heavily on millions of Africans who were conscripted as porters, or carriers, and who suffered, by far, the highest proportion of casualties throughout the campaign.
By 1915, resources on both sides were spread hopelessly thin, leading to a guerrilla war in which troops materialized in small units to sabotage supply lines, burn crops or attack enemy forces, then disappeared back into the jungle. Beck says the map – British-made and most likely copied from an existing German map – would likely have played a role in fighting this type of war.
“It was probably used for a couple of things,” says Beck. “As a route map to get troops and supplies from one area to another, or to cause havoc – to identify areas where they could ambush the enemy or destroy rail lines and bridges. It would have been carried by the officer in command of the unit and used for navigation.”
By the time German troops officially surrendered their arms on November 25, 1918, the campaign in German East Africa had taken a heavy toll. In addition to hundreds of thousands of military and civilian casualties, great swaths of farmland had been destroyed and, in some regions, whole populations had been decimated causing economic, social and cultural devastation, the effects of which would be felt for generations.
Beck says this map serves as a rare symbol of the war in German East Africa which, in its own distinct way, was as brutal as any campaign fought on the Western Front.
“This map is a small lens, but it brings into focus some key focal points in what, in many ways, has become a forgotten war,” says Beck. “I’ve only seen a reference to a map like this once before, and in that case, the author who wrote about the existence of these ‘bug zone’ maps had never seen a surviving example himself. I believe it to be truly rare, and our students to be truly fortunate, as it opens the door to a little-known chapter of the Great War.”
McMaster University Library’s entire world-renowned World War One map collection is available to researchers online as part of the Library’s Digital Archive.

